Happy Easter


The eggs are pretty clustered together like this but would also be pretty if all, or some, where in egg cups.
A word about rub ons. I have found, much to my dismay, that Michael's and Hobby Lobby aren't carrying them as much as they used to. In fact they only carry a few and they are usually themed out- wedding,family, baby. I assumed the companies were no longer making them. Not true. Rub ons are available online and there is no lack of designs or variety. In fact I think there are more interesting designs today than last year. The Frantic Stamper has a HUGE inventory of rub ons from a wide variety of companies. Christy at Scarlet Lime carries a number her favorite designs. Two Peas in a Bucket carries a good variety as well and I scored a ton of Basic Grey rub ons on Ebay a few months ago. You may have to go searching but you can find rub ons that fit your design.
Laters Baby….

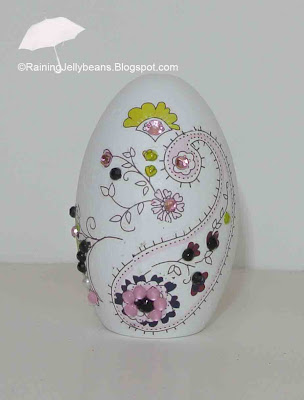
These pretty little Easter eggs are made from Wooden eggs- from Michael's- and scrapbooking supplies.

I used rub ons, adhesive-backed rhinestones & pearls, and glitter. That's it! But oh what an impact these simple supplies make on a basic white egg.

I used Basic Grey brand rub ons because they are so detailed and the colors are beautiful. Any floral-ish or flourish-y rub ons will work for this project. I prefer to cut the rub ons apart and apply them in a haphazard new pattern. This gives me a unique... one-of-a-kind... look from a mass produced product. You don't need to go to this extreme....it's just the way I roll.


The nice thing about this technique is you can take it from sophisticated…to charming…to whimsical...to cute...to outlandish. Whatever fits YOUR aesthetic. Find the rub on that fits your design ideas and go for it.
Keep in mind that this technique relays on rub ons. You can decorate eggs using stickers, decorative paper cutouts or tissue paper but they give a very different look.
I don't always cut apart the rub ons. Sometimes even I use them as intended.

The bunny and flowers came off the same sheet of rub on and I applied them as is…no scissors involved.

The same for the jellybeans egg.

Another cute- and very simple- egg is decorated with a monogram and crystals. I used a Making Memories alphabet sticker with my daughter's initial and added adhesive-backed rhinestones as polka dots. How cute would this be used as a place setting card using the initials of each guest? Set the egg in the center of the plate with a pretty napkin or a circle of shredded paper (or edible grass) forming a simple nest. You could also put the egg in an egg cup . A simple white egg cup like the one pictured is relatively inexpensive ($2 online) and widely available. Simply set it on the plate or centered above the plate on the table.

This egg is sort of a hybrid of the two techniques using rub ons. I kept the butterfly and bee intact but did some minor plastic surgery on the flowers to make my own design.


I love the way the eggs look when clustered together. The center egg (below) was made by making polka dots using a product that I cannot for the life of me remember what it is called. I thought it was water-droplet-something-or-other but I cannot find it. You could get the same effect using adhesive backed rhinestones/pearls or rub on circles.

There is a new product called Candi which would be cute as well.

The little paper dots are applied using little pop-dot type adhesive squares but you could use Glossy Accents. I would use Glossy Accents on the top to make the little dots shiny before I used them. Though the idea of a paper circle seemed silly to me I thought the little dots were actually fun when I used them on the pennants on a project for this Things Crafty

The blue circles with the silver stars are Candi.
The eggs are pretty clustered together like this but would also be pretty if all, or some, where in egg cups.
A word about rub ons. I have found, much to my dismay, that Michael's and Hobby Lobby aren't carrying them as much as they used to. In fact they only carry a few and they are usually themed out- wedding,family, baby. I assumed the companies were no longer making them. Not true. Rub ons are available online and there is no lack of designs or variety. In fact I think there are more interesting designs today than last year. The Frantic Stamper has a HUGE inventory of rub ons from a wide variety of companies. Christy at Scarlet Lime carries a number her favorite designs. Two Peas in a Bucket carries a good variety as well and I scored a ton of Basic Grey rub ons on Ebay a few months ago. You may have to go searching but you can find rub ons that fit your design.
Laters Baby….


No comments:
Post a Comment
I love reading your comments...